

Everything You Need To Know To
Write Music Using Sibelius
Back in 2010 I decided to take my first serious music class. Up until this point I had mainly focused on maths and science related subjects and had kept music as an extra curricular activity. Due to a growing interest in performing, I thought it might be a good idea to try and learn more about theory and whatever else a high school music class might offer. So after somehow convincing the teacher that I would be able to keep up with the other students who already had a music theory background, I was admitted into the class and plunged myself head first into topics I knew almost nothing about.
At that time in Melbourne, the senior classes had regular assessments called SACs (school assessed coursework) which would contribute to your final score for the class and impact your chances of being accepted into a university program. Unlike the statewide exams which were written by the government and graded by private examiners, SACs were created and graded by your teacher. Although the class didn’t require knowledge of notation software for the final exams, my specific classroom teacher thought it would be a good idea to make one of the SACs require the use of Sibelius. Regardless of my music theory knowledge, or lack thereof, I had never used any sort of digital notation software or written music at all. To make things worse, the teacher never instructed the class on how to use Sibelius.
I don’t remember what my grade was for the SAC, but I do still remember the dread of having to face Sibelius head on in what seemed like a high pressure scenario at the time where my hopes to be admitted into university may be impacted. It’s safe to say that no one should have to try and learn the program in those conditions.
After graduating from school, I decided to start my own funk band with a number of friends. Knowing nothing about running a band, I quickly realized we needed music to play, and due to my dreams of having a large horn section, that meant writing out our own sheet music. Having acquired no more Sibelius skills than my first foray a year earlier, I decided to take the plunge and pay an arm and a leg for the software. Me and my friend Brodie would get together and write where possible, and before long I worked out the basics for the program.
Fast forward to today and I’ve now used Sibelius for over a decade professionally. I never was formally taught how to use the software and over time picked up dozens of tricks along the way. Like all notation programs, Sibelius has its flaws, but I’ve gotten used to them and have developed a workflow that helps me use the program efficiently. I can effortlessly write the music I want to create and format it in a way where musicians are able to interpret it accurately.
Now you don’t need to use Sibelius to get the same results, it is just my chosen program, but if you are wanting to learn more about the software I’m here to help you. On this page I break down all of the functions of the program that I use regularly. This is by no means an exhaustive list of what you can do on Sibelius, just a summary of what I find helpful. There may be aspects of the program that you want to use that I haven’t mentioned, in which case I would suggest browsing the Avid forums for more information. I’m also always interested in hearing about functions that might be beneficial to my workflow, so if there’s something I’ve missed or a feature you know of that is an improvement on anything I’ve written, please let me know.
Due to the enormous scope of Sibelius, I’ve tried my best to divide the functions of the program into categories defined by the menu titles found on the main interface. Realistically, when I use the program I may use dozens of different functions within a matter of seconds and generally don’t think of them by these categories. However, teaching in this way is confusing and creates the very real possibility of missing something. I also have tried my best to include both a manual pathway and a hotkey for everything listed so that you can clearly see how to access a function when you don’t know the hotkey.
Sibelius takes a long time to master and using it is like any other skill, the more you work on it, the better it will get. My biggest recommendation is that when you start out, you take the time to learn the hotkeys. These are by far the best aspect of the program and can help you write music very fast once memorized. Although it may seem hard to manually force yourself to use a hotkey at the start of your journey, later on you will thank yourself for making the effort.
A quick side note before I get started with each category. Sibelius has gone through dozens of updates since I first picked up my copy in 2012. Sometimes new functions are added, sometimes old ones are changed or removed. The information on this page is based on the full version of Sibelius 2024.8 and some points may not be relevant to the version you are using. For the major functions, most will likely still be applicable but may be located in a different place in the program so you might just have to look around to locate them. I also use the Sibelius Ultimate version for PC, so if you are using a cheaper option some of the functionality may be affected or if you are using a Mac some of the hotkeys mentioned may be different. In most cases though, hotkeys can be found next to the manual location of each function so with the information on this page you’ll be able to see which ones are the same or not. Often the only difference is that the ctrl key for PC is replaced with the cmd key for Macs. With that said, let’s dive in.
Contents
Due to the significant size of this page I thought it might be best to include a contents section which links with each individual topic. The page is designed to be read from top to bottom, so if you do decide to jump to a certain section be mindful that some terminology may have been introduced and explained earlier.
Quick Start Menu (Quick Start Menu)
Getting Started (note input, highlighting, keypad)
File Tab (Save, Export, New File)
Home Tab (Copy, Paste, Add/Change Instruments, Transposing Score, Add Bars, Filters, Flip Stems, Hide/Show, Set Metronome Mark)
Note Input Tab (Tuplets, Respell, Repeat, Transpose, Multiple Voices, Interval Up/Down, Explode/Reduce)
Notations Tab (Clef, Key Signature, Time Signature, Pickup Beat, Lines, Slur, Crescendo, Symbols, Noteheads, Bracket or Brace)
Text Tab (Text Formating, Staff and System Text, Chord Symbols, Rehearsal Marks, Bar/Page Numbers)
Play Tab (Mixer, Playback, Swing Interpretation)
Layout Tab (Document Setup, Staff/System Spacing & Placement, Page/System Breaks)
Appearance Tab (Engraving Rules, House Style)
Parts Tab (Part Creation, Copy Part Layout)
View Tab (Document View, Zoom, Keypad)
Miscellaneous (Search Bar, Startup Music, Changing House Style Font Options)
Quick Start Menu
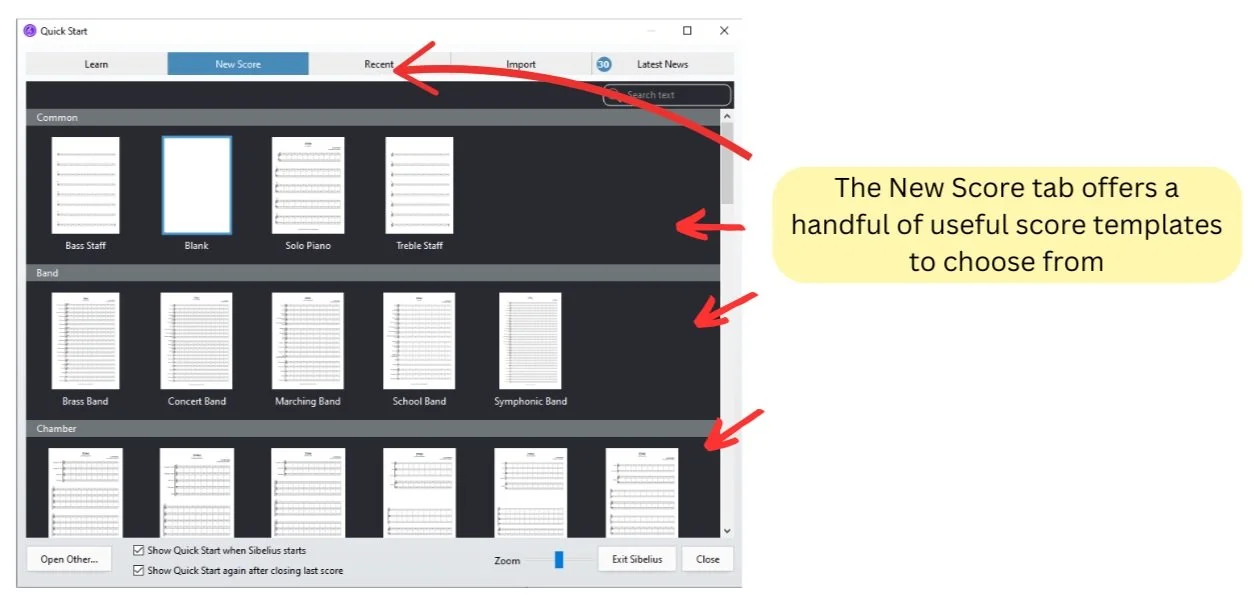
The first thing you’ll see when you open up the program is the Quick Start menu. It is made up of a number of different tabs and is the go to location for creating your first score. Immediately, you will be presented with the New Score tab which has various templates to help get you started. If you click on any of the given options a secondary screen will appear where you can set up your score. All of the options here are quite self explanatory and can be added or changed once in the main interface of the program so don’t worry if you put in the wrong time signature or need to add a pickup beat later.

When I was first starting out with Sibelius I made heavy use of the functions on the New Score tab but didn’t know how to change them once I was sent to the main interface. Although these functions will all be explained through each of the relevant tabs later on this page, I figure it might be a good idea to do a quick summary of where to find them now to save you the trouble of creating a new score. I’ve left out any relevant hotkeys and secondary locations just to keep it as simple as possible.
Document Setup
Once in the main interface the Document Setup options are spread across three different tabs. In the Home tab you’ll find a section called Instruments where there is the Add or Remove function. When clicked, it brings up the exact same menu as the original Change Instruments option in the Quick Start menu.

In order to change the page size and orientation we have to move to the Layout tab where on the far left you will see a section called Document Setup. Here you’ll find both the Orientation and Size function which when selected will provide a dropdown menu with multiple options.

The last option is to select the house style which can be done by moving to the Appearance tab where on the far left you will find the House Style section. For the same functionality as the original Quick Start menu, click on the Import option to bring up a menu with all of the same house style options.

Time Signature Setup
Shifting to the next setup option, to change or add a time signature you need to go to the Notation tab. On the far left in the Common section you can select the Time Signature function to bring up a dropdown menu with various options. In the same menu, if you click the More Options text at the bottom a new window will be opened where you can create a Pickup(Upbeat).

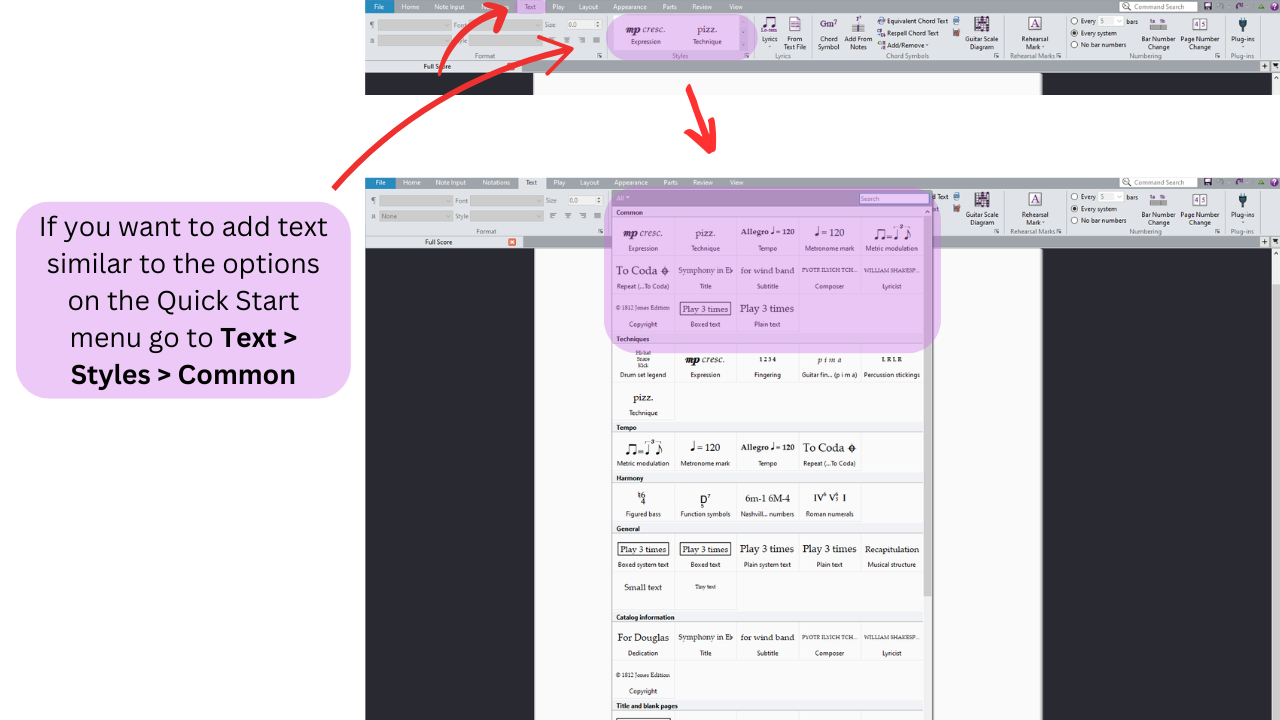
To add tempo text and/or metronome marks we have to go to the Text tab where we will find a large variety of text based options under the Styles section. Depending on how large your screen is, both the Metronome mark and Tempo options may be on display without the need to do anything else. Otherwise you can find them by clicking on the downward arrow in the bottom right corner of the section to open a large dropdown menu where they are located under the Common heading.

Key Signature Setup
If you’ve been following thus far, you may have already noticed how to change key signatures in the main interface as it is in a similar location to the time signature function. However, just in case you’ve come directly to this paragraph, to locate the function go to the Notation tab. Under the Common section on the far left you’ll find the Key Signature function, which when clicked reveals a dropdown menu with a number of different options to choose from.

Score Information Setup
For the final setup functions, all but one can be found in the same location as the metronome mark and tempo options discussed earlier. That is, in the Text tab under the Styles section. Depending on the size of your screen, some of the functions may be visible without needing to do anything further, however if necessary you can click the downward arrow in the bottom right corner to open a dropdown menu where you’ll find the Title, Composer/Songwriter, Lyricist, and Copyright functions under the Common heading.
To create a title page we have to go to the Layout tab and locate the Document Setup section on the far left. There we will find the Title Page function, which when clicked will open a new menu where you can fill out the relevant information you want on your title page.

Quick Start Menu - Import Tab
Going back to the original Quick Start menu, the Import tab is also quite useful if you plan on inputting non .sib files into the program. After using both PhotoScore and AudioScore in the mid 2010s, there were too many issues with both programs and it was much quicker to manually input notes than have either program try and convert files into notation. However, the other two functions found in this tab are quite useful if you want to open files created in other notation programs or DAWs.
All major notation programs allow you to export a file as a MusicXML or MIDI which can be read by Sibelius. This is fantastic for situations where your friend might be using MuseScore or Finale and you want to collaborate but only have access to Sibelius. There will be formatting issues when using either these import features, however they are significantly better than manually inputting the notes.

Main Interface
Once you’ve made your selections in the Quick Start menu you will be confronted with the main interface of Sibelius. Although the developers try to make it as user friendly as possible, due to the capabilities of the program the interface can be considerably daunting when you are just getting started. I don’t know how many hours I’ve spent navigating the different menus trying to find a different function only to be left frustrated. Not to mention, the countless times I’ve looked online for the specific name of a function so that I can find it in the in-built search mechanic. The program is vast and learning it takes time.
As there are so many different ways I could unpack the numerous Sibelius functions I find most relevant for arranging, let me first explain how I’ve chosen to organize the information before jumping in. Whenever anyone chooses to use Sibelius it is for one main reason, to write music. So to begin with, we will look at exactly how to do that by unpacking how to input notes, rhythms, and basic text into the program. From there we will look through every single tab found on the main interface and bring attention to any important functions that you should be aware of. I won’t cover every option, only the ones I use commonly or have found useful. Finally, we will look at other relevant tools that can help you be more efficient with the program.
Most functions in Sibelius have two or three ways to be accessed. For the most part, the functions that are often used like text, dynamics, note input, etc all can be added through a manual process where you locate the relevant tab and section, or can be done more quickly through a hotkey. Some also may be located through the right click menu too. I’ll try my best to include all of the options along the way but will likely miss a few due to the number of options covered in this resource. With all that being said, let’s start off with the basics.
Getting Started
After setting up your document, the first thing to know in Sibelius is how to input notes as without them you can’t really write sheet music. When I first got started with the program the only way which seemed obvious was to click on a rhythm on the Keypad and then click somewhere on a given staff. Alternatively you can flip the process and click a desired rhythm on the Keypad and then go to the Note Input tab where you’ll find the Input Notes function on the far left of the Note Input section. If for some reason the Keypad didn’t appear when you got to the main interface, go to the View tab and locate the Panels section where you’ll find a checkbox option for Keypad.


If you’ve ever done this you know just how slow the process is to manually click every single note. Luckily there is a much quicker way to input notes and rhythms without the need to connect a MIDI controller. But first it requires a bit more knowledge on how Sibelius operates, specifically understanding the different mouse formats, highlighting options, and in-built keyboard shortcuts. I know that seems like a lot right now for simply inputting notes, but if you understand the inner workings of these three aspects it will save you a lot of time across the entire program.
Difference Between The Blue & White Icons
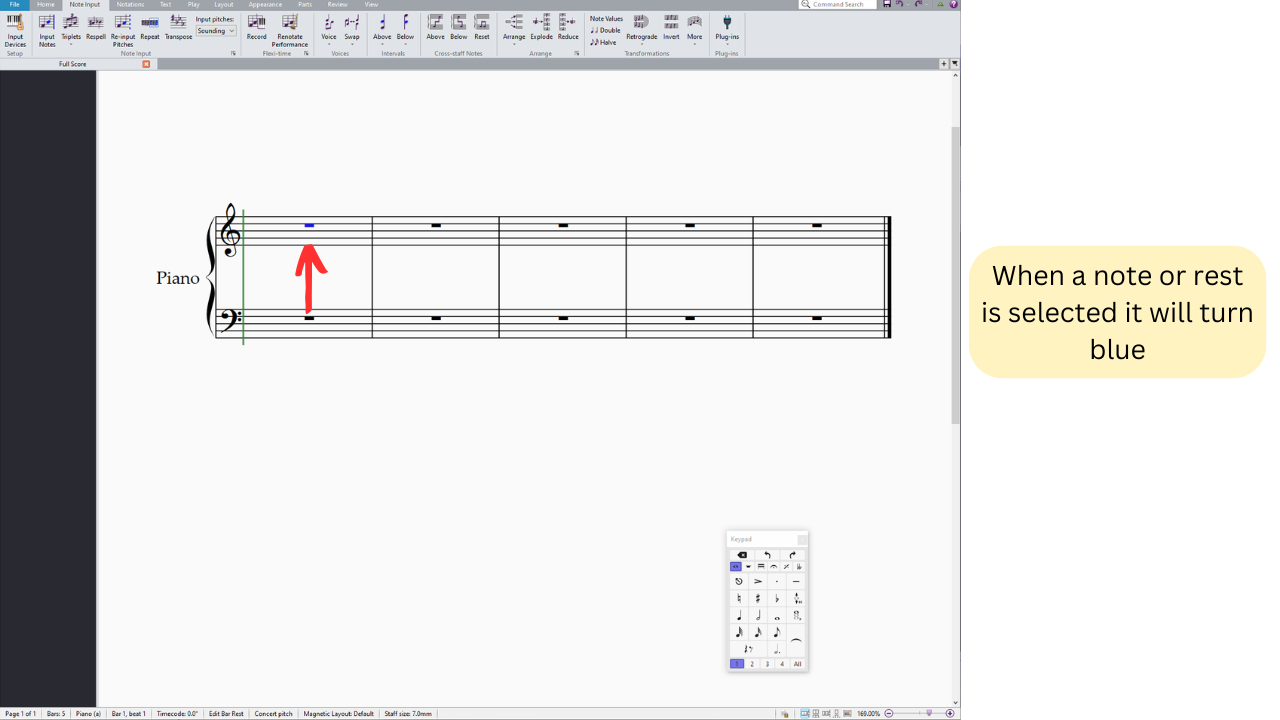
When dealing with the main interface there are two different variations that your mouse can have. White is the default where the pointer operates like normal, whereas blue indicates that a function has been selected and will occur when you next click on the score/part page. Looking back at how we input notes a moment ago, when you click a rhythm on the Keypad or select the Input Notes function through the relevant tab, you will notice that your mouse turns blue. By selecting the function first, the mouse has been loaded with the note input function which has caused it to turn blue. Once you click anywhere on the score/part page, it will activate the note input function resulting in a note being placed and the mouse will return back to its default white color. Regardless of which function you click on, if you select the function first it will turn the mouse blue and change how the mouse operates.

Alternatively you can flip this process and first choose the location you want the function to be applied to. To do so, you have to click somewhere on the stave such as a rest, which will result in the object being highlighted and changing to the same blue color the mouse was earlier. When an object is blue it means that whatever function you then select will be applied to said object. In this case we can select a bar, causing it to be highlighted blue, and then click a rhythm in the Keypad to create smaller rests.
Blue & Purple Highlights
Instead of selecting individual objects, you can also select multiple at a time by highlighting them. To do so you click an object and hold Shift + an Arrow Key in the direction you want to highlight. You’ll notice that a blue highlight box will appear that covers the selected objects.

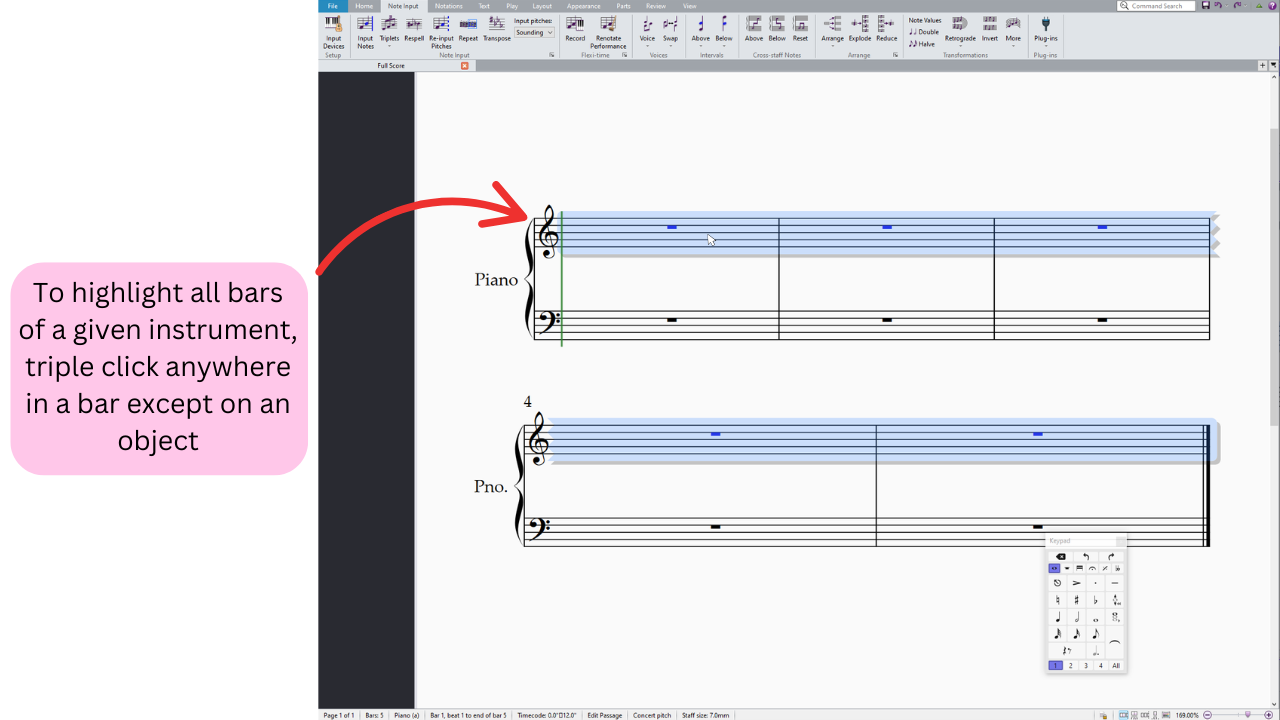
You can also highlight an entire bar by clicking anywhere in a chosen bar except for on an object. By doing so you’ll create a blue highlight box around the bar and can then use the same Shift + Arrow Key command to extend the highlight left, right, up, or down. If you want to select an entire line, simply double click on any bar in the line. To highlight all bars of a given instrument, triple click on any bar. If you want to highlight everything at once, you can go to the Home tab and find the Select section where the All function is located. Alternatively you can use the hotkey ctrl + A.


Within Sibelius there are two different types of highlights, staff highlights which are blue, and system highlights which are purple. In most cases, the only time you will be using highlights is to either delete passages or to copy and paste them. Up until now, all of the examples have used blue staff highlights, which when used alongside the delete or copy/paste commands won’t impact the structure of the sheet music. Whereas, a purple system highlight will either add or remove entire bars. As this is something that can be quite confusing to get used to, here's an example.
Let’s say you highlight a passage and want to delete it. Well if you do a blue highlight it will simply remove the notes and replace them with rests. However, if you do a purple highlight it will remove everything that was highlighted including the bar itself. Similarly, if you were to copy a blue highlighted passage and paste it elsewhere, the notes would be inserted into an existing bar and replace what was originally there. A purple highlight would instead insert more bars wherever you pasted the passage and not override any passages.
Generally, I use blue highlights for copying and pasting individual phrases or chord symbols and use purple highlights for adding more bars to certain sections. Both come in handy when deleting parts. To create a purple system highlight all you have to do is highlight the bar in question and then go to the Home tab, Selection section, and click the System Passage function. For a quicker pathway, simply hold ctrl before you highlight a bar.


Keypad
Now that we know a little bit more about how Sibelius works we can get back to inputting notes and look at one of the best features of the program, the Keypad. This small pop-up window will save you so much time if you use it alongside a keyboard which has an added keypad. That’s because every single command on the window is synced to the keypad which makes selecting anything on it much quicker than manually going through and selecting the functions with your mouse.

Looking at the Keypad there are dozens of different functions divided into six main categories: Common Notes, More Notes, Beams/tremolos, Articulations, Jazz Articulations, and Accidentals. You’ll also be able to add up to four unique voices regardless of which category is selected. All of the functions are displayed through graphics which makes the process of selection quite intuitive. As many of the functions located on the Keypad are the most used in the entire program, I would highly recommend getting comfortable with each category and where each function is located.
COMMON NOTES
This is the default category on display when the Keypad is open and includes a number of the most likely to be used functions. These include basic accidentals, articulations, rhythms, ties, and rests. There are a few other functions but they are generally used far less or not at all.

MORE NOTES
In the second category you’ll find a number of lesser used functions that may only come in handy once or twice in a whole arrangement, if at all. However, there are a few which get used more frequently such as the various grace notes, cue size on/off, slide, and bar rest functions.

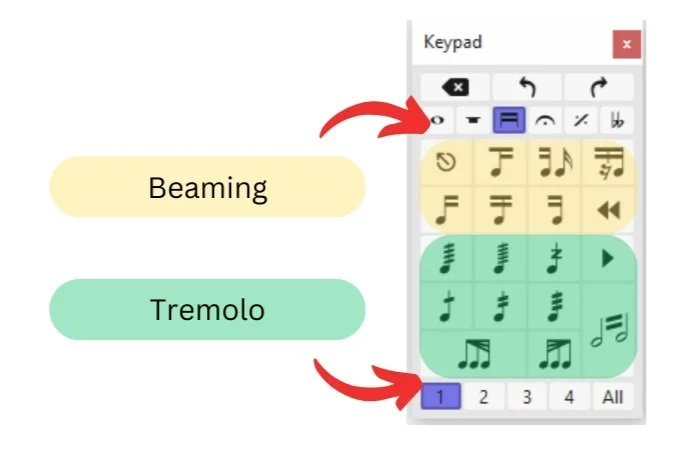
BEAMS/TREMOLOS
Unlike the previous two categories, the title of this particular one tells you everything you need to know about the functions within the category. Here you’ll find all of the beaming options you may need as well as various tremolo subdivisions.
ARTICULATIONS
Other than the common articulations found in the Common Notes category, here you’ll find other options such as marcato, fermatas, as well as the plus and open symbols used for plunger and high hat notation.

JAZZ ARTICULATIONS
In this next category, you’ll find even more articulations that are quite useful in jazz situations like scoops, doits, plops, and falls. It is also the location for repeat symbols and rolling chords on piano or guitar.

ACCIDENTALS
For the final category we have everything you might need for accidentals. I personally never use this window as I don’t write microtonal music and tend to avoid double flats and double sharps. However, it’s good to be aware of if that’s your thing!

ALLOCATING VOICES
Sometimes you want to write multiple voices on the same stave with individual stems. Well no matter which category you have selected, at the bottom of the Keypad you’ll find four numbers which represent a unique voice. To add a unique voice to a stave, all you have to do is select a number different from the one you are currently using (in most cases that will be the default voice 1). Each voice is color coded to make it easier to identify. Sometimes using multiple voices can cause issues with note head direction, so the general rule is that Voice 1 (blue) and Voice 3 (orange) are used above Voice 2 (green) and Voice 4 (pink). As most conventional keypads don’t come with keys to be allocated to these functions, the hotkey is Alt + 1 (for voice 1), Alt + 2 (for voice 2), Alt + 3 (for voice 3), and Alt + 4 (for voice 4).

OTHER FUNCTIONS
Alongside voice selection, in every category you’ll also find a number of other general functions which include delete, undo, redo, and cancel/stop/select none. For the most part, these functions are universal across a number of different software and thus share the same hotkeys as programs you may already be familiar with. However, in case you haven’t come across them before the hotkeys are as follows. Delete - delete or backspace, Undo - Ctrl + Z, Redo - Ctrl + Y, Cancel - esc, Cut - Ctrl + X, Copy - Ctrl + C, Paste - Ctrl + V.

Inputting Notes Efficiently
So it’s taken a second but we have now explored all but one of the functions necessary to input notes efficiently in Sibelius. The last piece of the puzzle are the actual notes themselves which we can create quite quickly through the keyboard. Instead of manually placing a note by selecting the duration on the keypad and then manually moving the blue cursor over the staff, we can actually click on the location first and then type a note name on our keyboard. For example, if you press G, a G will appear on the staff. Once you get used to this method, you can combine your right hand on the keypad while your left hand types the note names to create an efficient system which hardly requires the mouse. As almost all of the main functions can be found on the keypad or through hotkeys, you are able to write music at rapid speeds. It takes a second to get used to but is extremely satisfying once it becomes comfortable.

Right Click Dropdown Menu
Similar to the keypad, there are a number of great functions found in the right click dropdown menu. However, it is worth noting that there are actually two different right click menus, one which appears if you right click on a specific bar and another when you right click anywhere else on the score/part. Both have many different functions which are worth familiarizing yourself with. However, unlike the keypad, all of the functions can be found elsewhere in the program but I’ve found that the right click dropdown menu is considerably quicker than other methods.
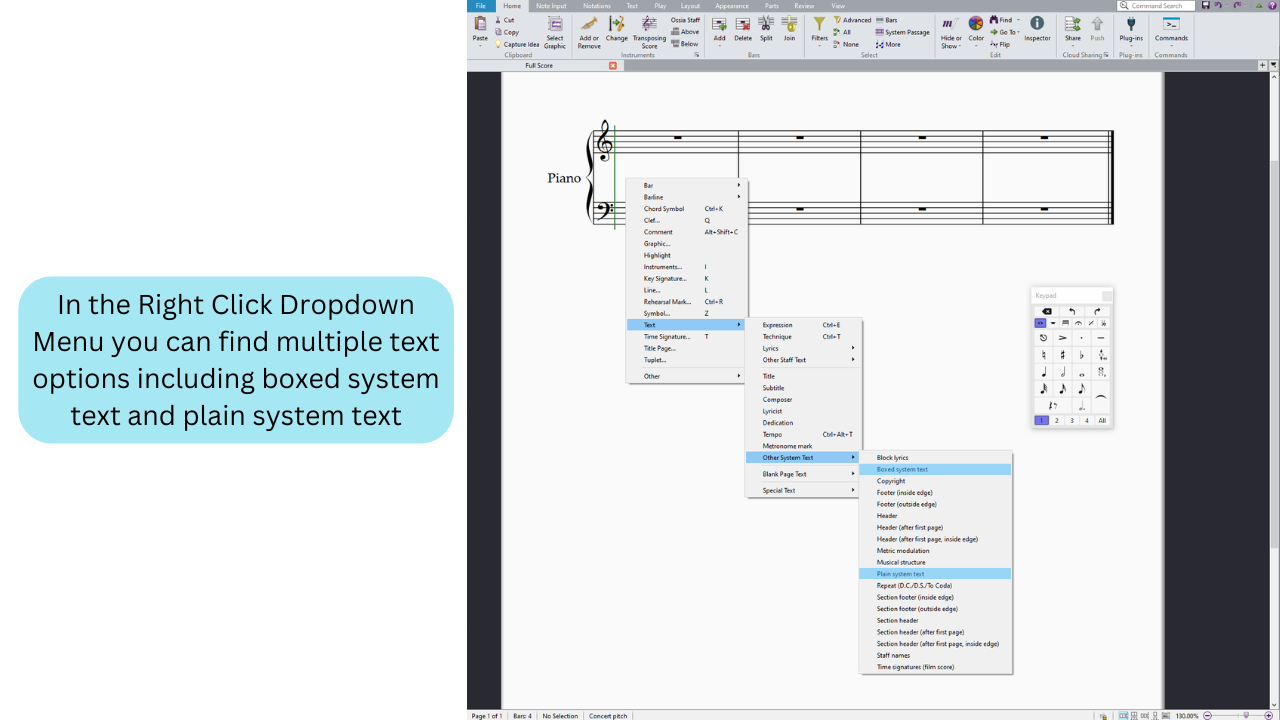
Personally, I use the normal menu (right click anywhere) for special text such as system text and box text. To find either option first you Right Click, then go to the Text section, and go to Other System Text where you’ll find Boxed System Text and Plain System Text. Both are great options for creating a single line of text that will appear on all parts. You can also find roman numerals for analysis purposes by selecting Other Staff Text and clicking on Roman Numerals.

On the other hand, the other right click menu (right click on a specific bar) is useful for the Hide or Show and Magnetic Layout functions. The first allows you to hide notation in your parts or scores, and the second allows you to disable magnetic layout when formatting. In most cases you’ll keep magnetic layout on as it stops objects from colliding with one another but in some cases it may need to be swapped off when formatting.

There are dozens of other options found in both right click menus and you may find it more efficient to use them through that menu instead of a hotkey or using the main interface tabs. For me, I’ve only mentioned the specific functions I use from them, with all other relevant functions being mentioned elsewhere on this page with their specific hotkey shortcuts.
Tabs Galore
For the most part, you should now feel comfortable doing the basics on Sibelius. That is to say, you know how to input notes and have a bit of an idea about where to find different functions. For everything else you’re going to have to look into one of the eleven different tabs at the top of the program. There is a whole lot of functionality spread out between each one and this is where things start to get overwhelming (if you aren’t already feeling it). Below you’ll find a breakdown of each tab and the main functions you should be aware of. Instead of covering absolutely everything, I have chosen to only mention the functions which I use regularly and think you may need to know about.
Sometimes the information found within a tab disappears, in which case the ribbon which displays all of the functions has been minimized. To make all of the options reappear, simply go to the top right corner of the screen and click the green arrow.


File Tab
If you are looking to save, print, or export then the File tab is where you’re going to find it. Unlike every other tab, when you click File it completely changes the Sibelius interface. On the left side you’ll find a new column with various options which you’ll likely be familiar with as they operate in the same manner as other programs. The most important option in my mind is the Save function. Sibelius is known to crash so saving often is a must. Like every other mainstream program, the hotkey is Ctrl + S, with Save As being Ctrl + Shift + S.

I don’t typically print directly from Sibelius, and instead opt to export my scores/parts out as a PDF. To do this, click on the Export option and select PDF, where you’ll find a number of different PDF options to choose from. There are also a number of other handy features under Export such as Audio where you can export an mp3 of your score/parts, Graphics where you can export a picture file of a score/part (this is how I create my notation graphics on this website), MusicXML where you can export your score/parts out in a format which can be opened by other music notation software, MIDI where you can export your score/parts as a MIDI file which can be opened in a DAW, and Previous Version where you can export out your score/parts as older Sibelius versions all the way back to Sib 2!

If you are wanting to start a New file or Open another score, you’ll also find both options in the File tab.

Home Tab
Moving over to the Home tab, this is the default option opened when you startup Sibelius. Here you’ll find a lot of the most common functions. As we’ve seen already, each tab is divided into a number of different sections, with the Home tab including Clipboard, Instruments, Bars, Select, Edit, Cloud Sharing, Plug-ins, and Commands. For the sake of simplicity, we will not be covering the last three as you’ll most likely have a pretty good grasp of Sibelius once you start trying to incorporate them into your workflow.
Clipboard
On the far left of the Home ribbon, you’ll find the Clipboard section which includes many well-known functions such as Cut, Copy, and Paste. As these are standard commands shared across almost all major programs these days, I won’t go into how they operate. However, one differentiating factor in Sibelius is the Paste function, which has a variation to be aware of. Instead of just pasting a copied phrase normally, you can also Paste As Cue where it will convert the given phrase into a different voice and use the smaller cue notation. This is quite useful when you are wanting to add a vocal cue into a band part.
Hotkeys:
Cut - Ctrl + X
Copy - Ctrl + C
Paste - Ctrl + V
Paste As Cue - Ctrl + Alt + Shift + V

Instruments
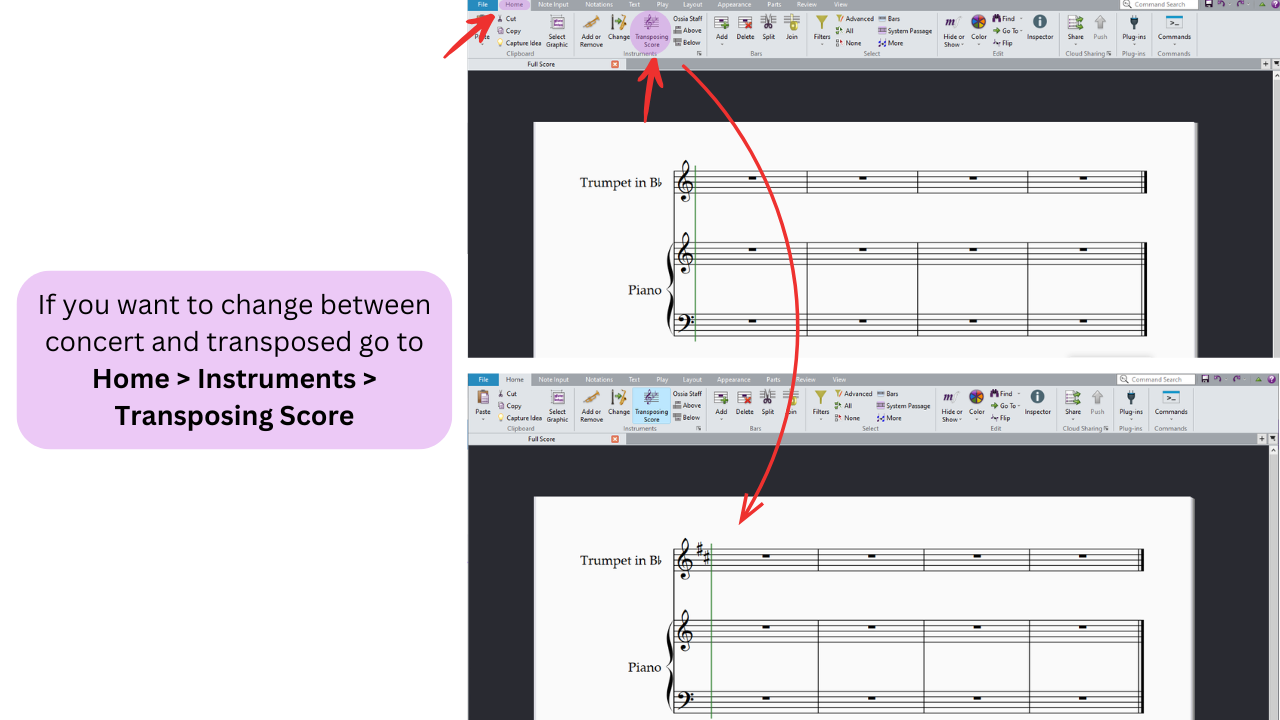
Like the name suggests, the Instrument section is the place to go to Add or Remove an instrument, Change an instrument, and convert your score into a Transposing Score. You will also find Ossia Staff options which can be useful if you need to have a smaller staff above or below a given line.
Hotkeys:
Add or Remove - I
Change - Ctrl + Alt + Shift + I
Transposing Score - Ctrl + Shift + T

When you click on the Add or Remove function, a new window will appear allowing you to add or delete instruments from the score. Sibelius comes preloaded with hundreds of different instruments, so if you can’t find one in particular make sure you look at the various options in the Choose From dropdown menu where you will be able to select from a number of different instrument libraries. Another great feature in this menu is the ability to change the score order through the Move Up and Down buttons, as well as add an Extra Staff Above or Below a given instrument.

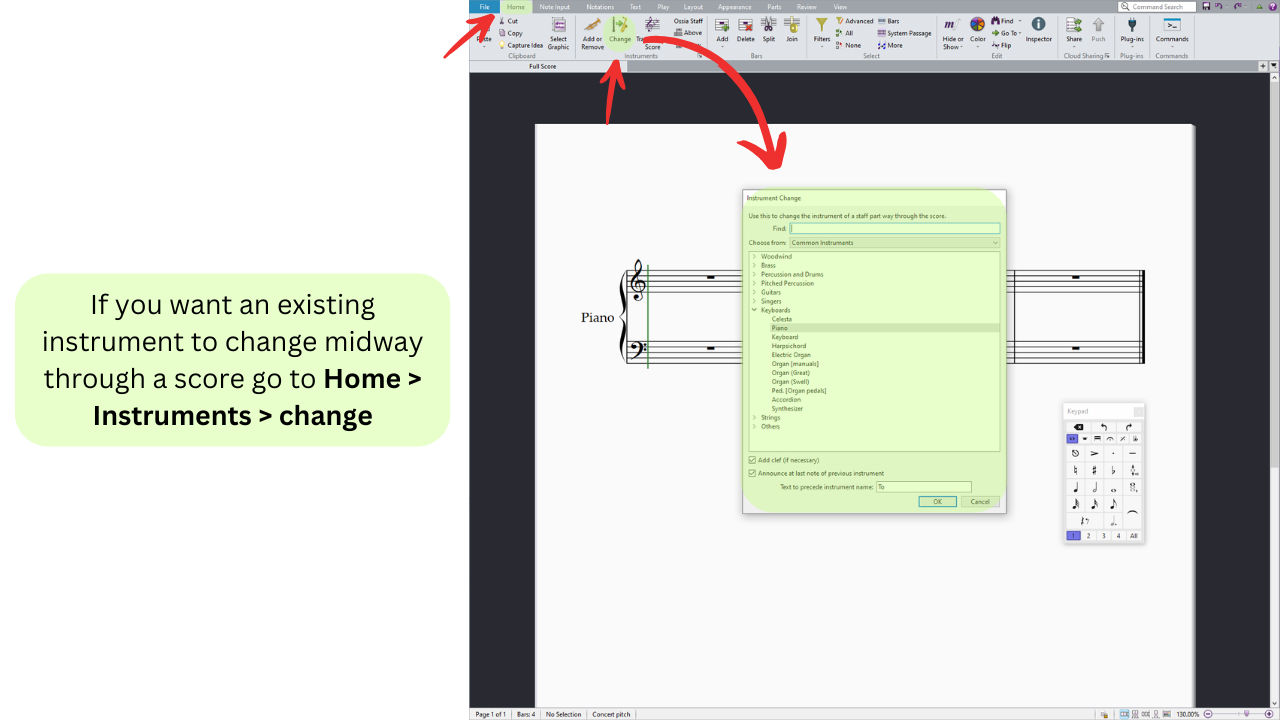
The Change instrument function also opens a new window with a large list of instruments to choose from. As the name suggests, this is the function you should use if you are wanting to change a given instrument to another. Something which is particularly useful for woodwinds who often double on a number of instruments.

The Transposing Score function works a little differently than the other two. Instead of opening a window, when activated (signified by a blue highlight box around the option) the score will be converted from concert pitch to transposing with all transposing instruments being shown in their written key.
Bars
Under the Bars section you’ll find a number of different useful options where you can Add bars to the end or the middle of a piece, as well as Delete any bars you’ve selected. For these functions to work effectively, you should first highlight the area you want to be impacted before clicking on the function.
Hotkeys
Add Bar At End - Ctrl + B
Add Bar - Ctrl + Shift + B
Delete Bar - System Highlight (Ctrl + Left Mouse Click) + backspace or delete


Select
Although there are a number of functions in the Select section, there really is only one which I use in high rotation, the Filters option. When selected a dropdown menu will appear with dozens of different filters. What this function allows you to do is refine a highlighted section to just the filter chosen. For example, if you are wanting just the chord symbols to be selected you could highlight a number of bars, click on Filters and then choose the Chord Symbols option. It would then deselect everything but the chord symbols. This is a fantastic function for when you are wanting to rapidly copy/paste or delete elements.

Edit
Over in the Edit section you’ll find three useful functions including Hide or Show, Color, and Flip. All three are quite intuitive, with Hide or Show allowing you to make certain lines hidden in either the score or the parts, Color changing the color of a given note, and Flip letting you change the direction of note stems. Out of the three though, Flip by far comes in the most handy.
Hotkeys
Hide or Show - Ctrl + Shift + H
Color - Ctrl + Shift + J
Flip - X

Tap Tempo Plug-In
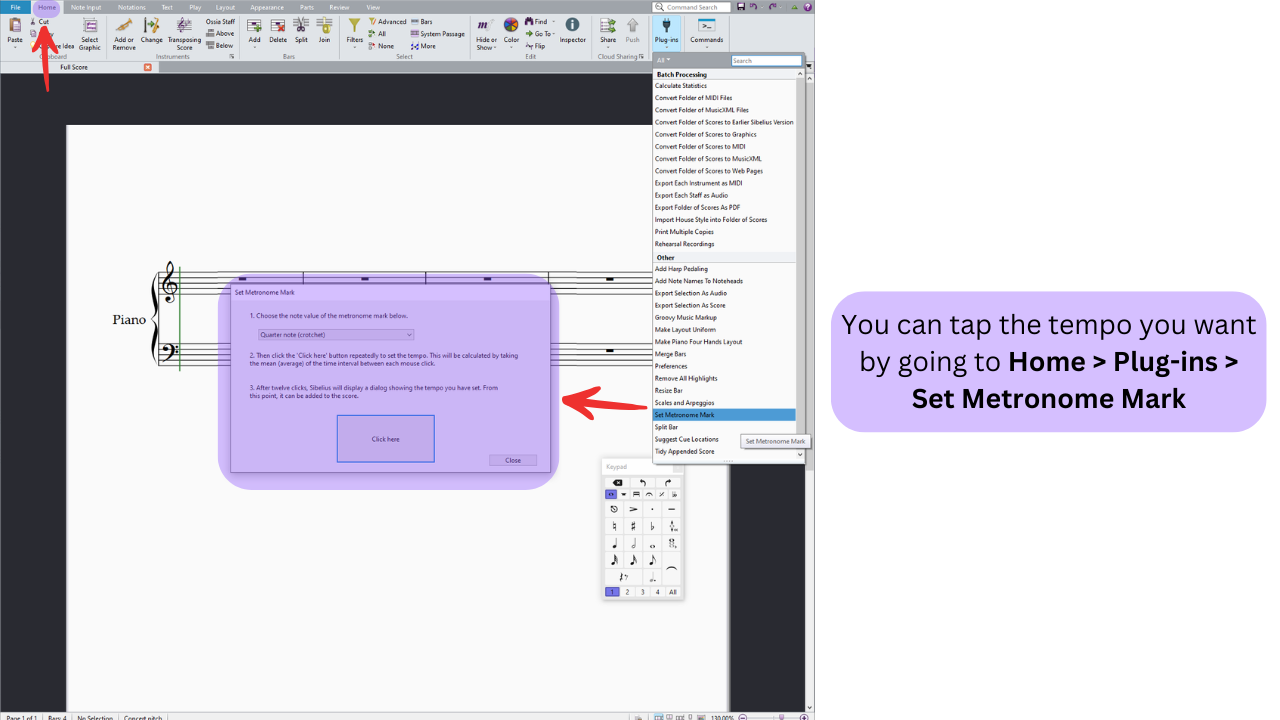
Although I don’t make use of really any of the inbuilt Sibelius plug-ins, there is one which comes in handy quite a lot. If you click on the Plug-ins function in the section by the same name, you’ll get a dropdown menu where you’ll find the Set Metronome Mark option. By selecting it, you’ll bring up a new window where you can create a tempo marking by tapping on the button. A very useful plug-in which is great when transcribing or if you have a specific tempo in mind for your piece.
Note Input Tab
In the Note Input tab, there’s no surprises to what you’re going to find. A whole bunch of functions to do with writing notes. There are so many useful functions here and as the primary purpose of Sibelius is to write music notation, you can imagine that you’ll find times where you may be using multiple of the functions in this tab simultaneously. The main sections to be familiar with are Note Input, Voices, Intervals, and Arrange, however there are a few other functions in the ribbon that you might find useful that I won’t cover here.
Note Input
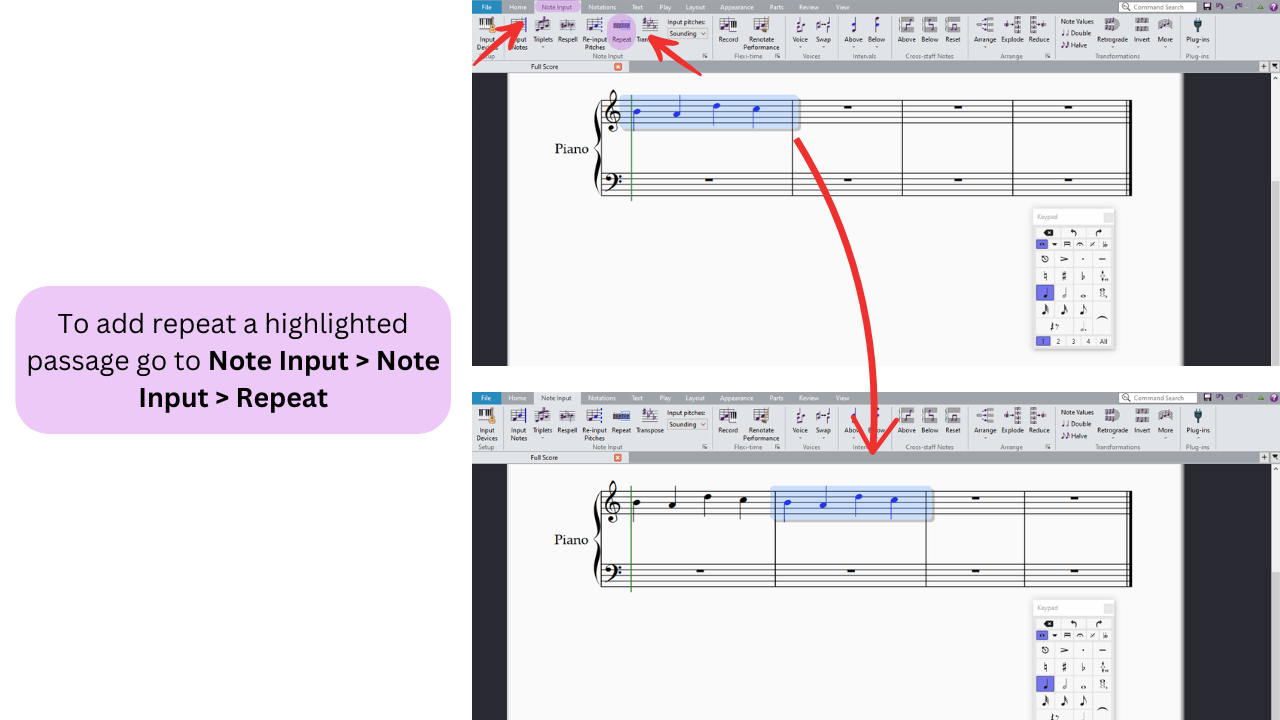
Earlier we looked at the Input Notes function which is a great way to start writing music in Sibelius. However, with the use of the keyboard it becomes somewhat obsolete. The other functions though, are incredibly useful. If you want to write any sort of tuplet you can click on the Triplet function to turn any rhythm into a triplet (or another kind of tuplet through the dropdown menu). The Respell function is wonderful when you want to change any accidental into its enharmonic equivalent, e.g. F# to Gb. Repeat can be a life saver when you want to quickly repeat a phrase or a whole chord progression. And finally, Transpose brings up a new pop-up window where you can transpose a given section by interval or by key.
Hotkeys
Tuplet - Ctrl + number (2 for duplet, 3 for triplet, 4 for quadruplet etc)
Respell - Enter
Repeat - R
Transpose - Shift + T


Voices
In a similar manner to the voice option on the keypad, in the Voices section you have a Voice option which allows you to write up to four unique voices on the same staff. I prefer using the keypad but you may like this option more. Additionally, the Swap function can be quite useful if you have written out multiple voices and want to reassign notes between the voices.
Hotkeys
Voice 1 - Alt + 1
Voice 2 - Alt + 2
Voice 3 - Alt + 3
Voice 4 - Alt + 4
All Voices - Alt + 5

Intervals
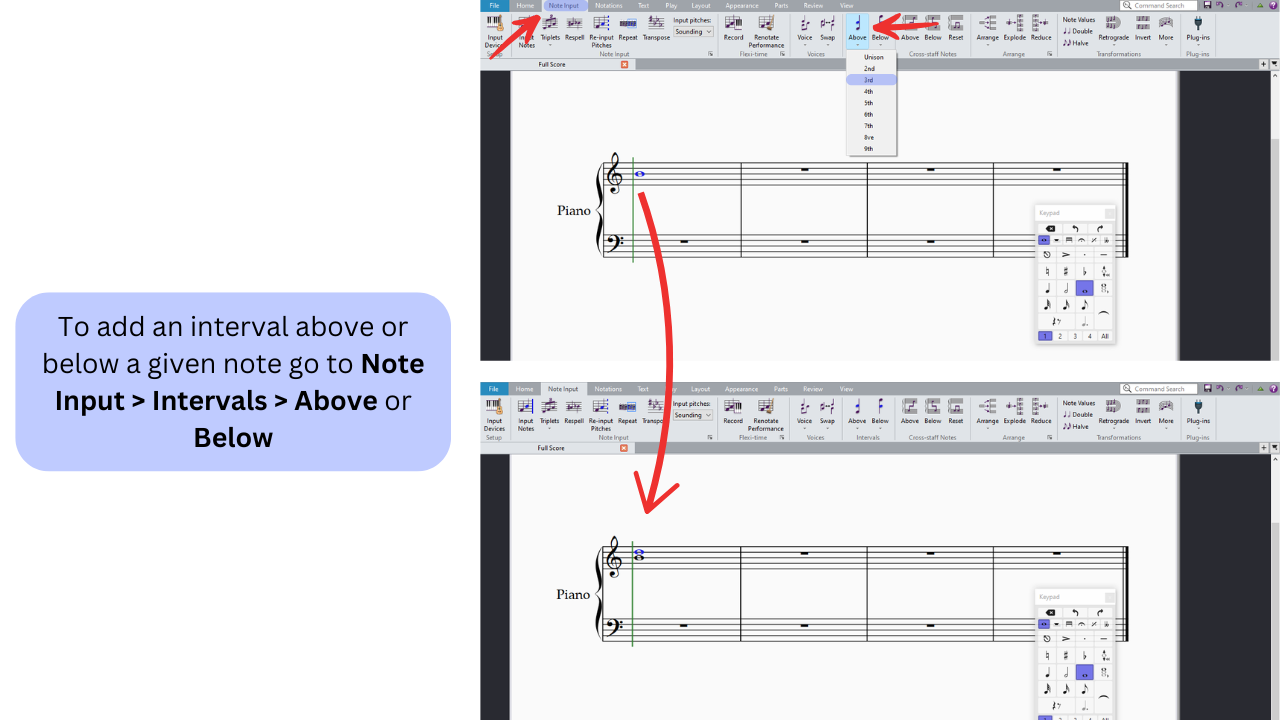
If you’ve been wondering how to write two notes at once, that can be found in the Intervals section where it provides options for voicing notes Above and Below. Fortunately, both options also come with their own hotkeys which makes the process considerably easier when inputting notes.
Hotkeys
Interval Up - number (1 for unison, 2 for 2nd, 3 for 3rd etc)
Interval Down - Shift + number (1 for unison, 2 for 2nd, 3 for 3rd etc)
Arrange
Arguably two of the best functions in the whole of Sibelius are located in the Arrange section, Reduce and Explode. The first allows you to reduce multiple staves at once into a singular part, while the latter does the opposite. They both operate in a similar way where you highlight the section you either want to reduce or explode and then you press Ctrl + C to copy the section. From there you highlight a location you want the new part to be pasted in and press either Reduce or Explode. If reducing, you’ll highlight multiple parts to begin with and reduce them into one staff. Alternatively, if exploding you’ll highlight one part to begin with and explode them into multiple staves. Reduce is great for score analysis, whereas Explode is great for transferring ideas to a score from a sketch.


Sometimes when you explode, you’ll notice multiple semibreve/whole note rests get added into the parts. A quick fix to remove them is to copy the entire line and paste it in the exact same location. For some reason this removes the doubled up rests.
Notations Tab
Like the previous tab, the Notations tab is quite the work horse and includes a lot of functions you’ll be using regularly. Almost all of the sections are useful but for this resource we will be focusing on Common, Lines, Symbols, Noteheads, and Bracket or Brace. If you can’t find a musical symbol on the keypad, then if it exists it will be found in this tab.
Common
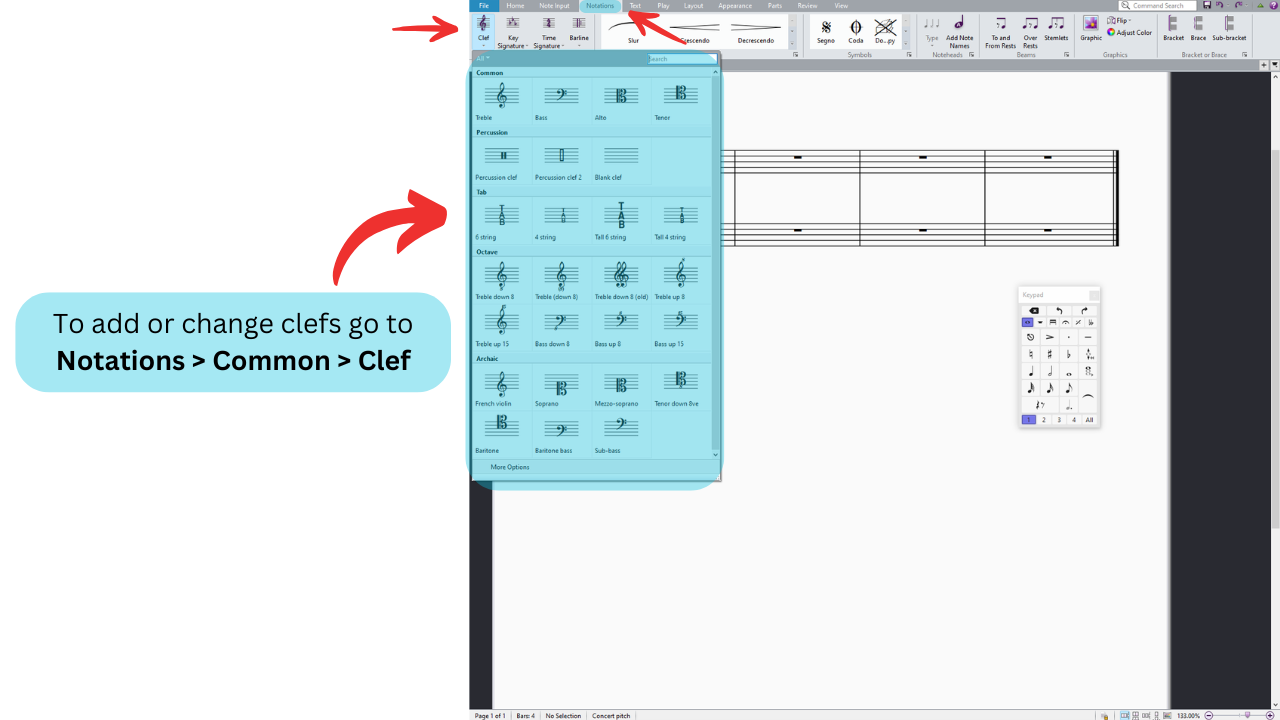
Within the Common section, you’ll find four fantastic functions, all of which come with dropdown menus with a number of different options. Up first is the Clef function which is where you’ll find all of the common clefs as well as many other options. I mainly use this when changing between bass and treble clef, but if you are wanting to write for instruments like viola, you’ll find alto and tenor clef as well as options like TAB too. Key Signature and Barline are exactly what you think they are, a dropdown menu full of all of the conventional key signatures and barline options you may need.
Hotkeys
Clef - Q
Key Signature - K
Time Signature - T


Then we have the Time Signature function. This dropdown menu is like the others and includes all of the most common time signature options but it also has a secret extra window if you click the More Options text. The new pop-up window includes a place to add a Pickup (Upbeat) which can be very useful if you decide to change the start of your score.

Lines
Unlike most sections, the Lines section displays a number of options in a built-in window within the ribbon. The most common are shown but there are many more options available if you click the dropdown arrow in the bottom right corner of the window. Here you’ll find a large dropdown menu filled with plenty of helpful techniques such as slurs, dynamics, tempo adjusting text, and much more. The most common functions I use from the menu are: Slurs, Crescendo, Decrescendo, Glissando, Rit, Accel, Trill, 1st. Ending, 2nd. Ending, and Shake.
Hotkeys
Lines Dropdown Menu - L
Slur - S
Crescendo - H
Decrescendo - Shift + H

Symbol
Similarly, the Symbols section also has a display window and as the name suggests, includes a number of different musical symbols. If you click on the dropdown arrow in the bottom right corner you’ll find a large menu of different options. Personally, there are only a few that I use regularly, such as the Segno, Coda, Turn, Caesura, and the Pitch Bend (labeled as a shake).

Noteheads
If you are looking to change the notehead of a given note, then the Noteheads section is the place for you. To access the Type dropdown menu you have to first select a note and then the function will become available. In the menu you’ll find a lot of useful options, with my personal favorites being the Slash and Slash With Stem options. However I also make use of the Cross and Cue noteheads too.
Hotkeys
Normal - Alt + Shift + 0
Cross - Alt + Shift + 1
Slash - Alt + Shift + 3
Slash With Stem - Alt + Shift + 4
Cue - Alt + Shift + 10

Bracket or Brace
This Bracket or Brace section comes in handy when you are wanting to reformat a score and group multiple instruments together. To get rid of a bracket or brace, simply highlight the object on your score/part and delete. To add a bracket or brace, highlight the lines you want to group together and then click the Bracket, Brace, or Sub-bracket function.

Text Tab
Text is an essential part of writing music and Sibelius is loaded with a lot of different built-in options. In the Text tab pretty much every section has some use when you’re getting started. However, once you get the hotkeys under your fingers, many of the functions found in the tab can be used purely through shortcuts so you may not find yourself opening the tab that often. Here you’ll find the Format, Styles, Lyrics, Chord Symbols, Rehearsal Marks, and Numbering sections.
Format
Like many word processing programs you’ve likely used in the past, Sibelius shares some of the common functions that you’re likely familiar with. In the Format section you’ll find the ability to change the Font, Style, Size, and the four common Alignment options (left, center, right, and justify). If you are wanting to add a new font to the list, Sibelius actually takes the fonts installed on your computer so all you have to do is make sure you’ve installed a given font and it restart Sibelius and it should appear.

As there are many different sorts of text which do different things in Sibelius, if you want to change between different types of text you can click on the Pilcrow symbol ¶ which will show you different options. I actually never use this particular function as I usually select the type of text I would like before typing but I could see it being useful if you want to change something from being plain to a chord symbol or a roman numeral.

Sibelius also makes use of two different sorts of text, ones which impact the playback and ones which don’t. To swap between them go to the lower case a symbol and click either None or Music Text. Music text is really only used for dynamics and rhythm symbols that you may use when writing out a tempo. Again, like the ¶ function, I never actually use this function through the Format section, and instead use it through other means found in the Text tab. However it is good to be aware of.

Styles
Pretty much every type of text available in Sibelius can be found in the Styles section. Similar to the window display we saw back in the Notations tab, the Styles section has a number of options viewable on the ribbon itself. However, all of the options can be accessed by clicking on the dropdown arrow in the bottom right corner of the window. Before jumping in, it might be useful to quickly clarify two terms that you’ll see used a lot. When using text in Sibelius there are two categories: Staff Text and System Text. The first refers to text which applies to a single staff whereas the second refers to text which applies to every part on a score. Some of the functions below are staff text options, whereas others are system text. When I first started out I didn’t know the difference and just used staff text everywhere which led to some pretty messy looking scores. Knowing the difference between the two options will help you simplify your scores and also make your workflow considerably more efficient. Getting back to the Styles section, there are an overwhelming amount of text options available, so to help simplify the process here are the ones I use the most often.
EXPRESSION (hotkey: Ctrl + E) - Staff Text that goes underneath a staff and by default is italicized. Primarily used for Dynamics, in which case you should right click to open a new menu with dynamic options. To add dynamics slightly quicker, simply hold Ctrl while you type in the expression text box.

TECHNIQUE (hotkey: Ctrl + T) - Staff Text that goes above the staff. Similar to the Expression option, right clicking will bring up a menu with various options you may want to use (I very rarely use this menu).

TEMPO (hotkey: Ctrl + Alt + T) - Exactly what the name suggests, this is a System Text option to add a new tempo and metronome mark. Right clicking will bring up various options, however the most useful are the rhythms. Sometimes when writing using tempo text you are placed in the Music Text option by default. This is so that you can write rhythms and what not, however it does lead to some very funny combinations when you try to type out a word. To fix this, simply go to the Format section that we previously looked at and change it back to None to write normally.

METRIC MODULATION - Although metric modulations can be uncommon, when you want to use one it can be quite annoying if you don’t know where the function is. This is System Text and like all of the previous examples, once you create the text box you right click to bring up a new menu of options. If you can’t find one that suits you, you can always select one that is closest and then edit it to your liking.

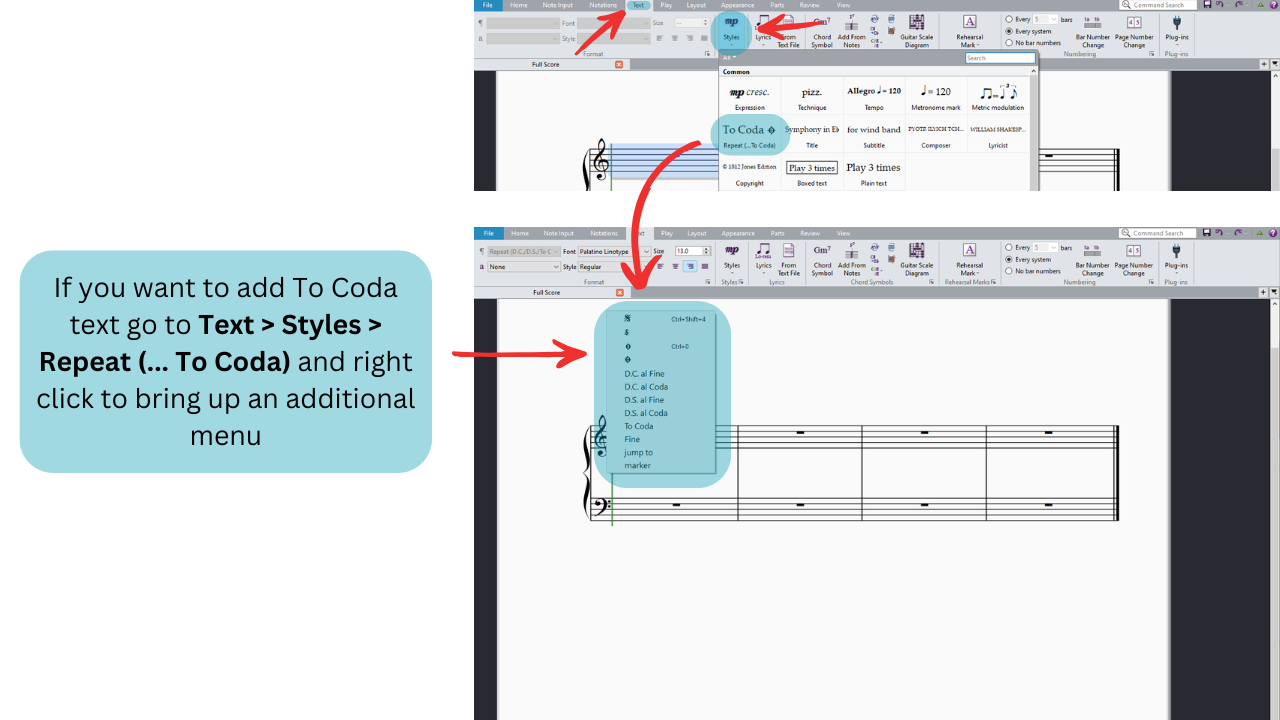
REAPEAT (… TO CODA) - This function doesn’t really need an explanation as it is all in the title. If you plan to use any sort of large repeats like D.C. or D.S. that apply to every part, all you have to do is click the function and then right click to bring up the different options. Unlike the Segno and Coda symbols that are found in the Notations tab and are staff text, if you use the Repeat (...To Coda) function it will be System Text which applies to the whole score and shows on every part.
BOXED SYSTEM TEXT - Exactly what the name says.

PLAIN SYSTEM TEXT - Again, exactly what the name says.

ROMAN NUMERALS - If you are wanting to analyze a piece and use figured bass or classical theory roman numeral analysis, this function is for you. I once used it a lot in my music theory classes at university, and it is the best way of getting clean, Staff Text, roman numeral analysis on the program. As with all of the options we’ve explored, once you’ve created the text box you can right click to reveal all of the available symbols.

Instead of using the Styles section, a far quicker way to access any of these options is from the standard Right Click Dropdown Menu. There you can find everything we’ve just unpacked without needing to use the Text Tab. After bringing up the menu, simply find the Text category and it will generally be quite intuitive to locate each of the functions.
Lyrics
Fortunately, the Lyrics section is somewhat more manageable compared to the previous section. It has two functions, both of which do the same thing but in slightly different ways. The Lyrics function gives you a dropdown menu where you can select which lyric line you want to insert. For the most part, Lyrics line 1 gets the job done unless you need to stack multiple verse lyrics on top of one another, in which case using the consecutive numbers is the best option.
Hotkeys
Lyrics line 1 - Ctrl + L
Lyrics line 2 - Ctrl + Alt + L

Alternatively, if you have the lyrics already written out in a text file you can use the other function found in the tab named From Text File. If you click on the function you’ll bring up a pop-up window where you can select your text file and choose from a number of formatting options.

Chord Symbols
Although there are a number of functions within the Chord Symbols section, there really is only one to be aware of and that is Chord Symbol. By clicking on the function, it allows you to write chord symbols above your music. In terms of how the chord symbols appear, we will touch on that when we get to the Appearance Tab later, for now all that matters is how the text box works. Chord symbols are linked to beats within the bar in Sibelius. Instead of selecting one beat at a time and clicking the Chord Symbol function, you can simply press Space to move one beat to the right. To move to the next bar, press Tab, and to move back a bar press Backspace.
Hotkeys
Chord Symbol - Ctrl + K

Rehearsal Marks
With only one function, the Rehearsal Marks section is quite easy to navigate. If you want to write a Rehearsal Mark, this is the place to come, and all you have to do is click on the function to place one. If you are looking to restart the sequence or write a consecutive rehearsal mark, both options can be found by clicking on the dropdown arrow next to the function.
Hotkey
Rehearsal Mark - Ctrl + R

Numbering
Finally, in the Numbering section you’ll find everything to do with page numbers and bar numbers. A number of the functions here can be found elsewhere in the Appearance tab (which is where I prefer to access them) however you should be aware of the Bar Number Change and Page Number Change functions. Both do exactly what the name suggests, and by clicking on either one you’ll bring up a pop-up menu with a number of options to choose from.

Play Tab
One of the best (and worst) aspects of Sibelius is the playback feature. It can be great as a tool to hear everything you’ve written but also doesn’t necessarily replicate how a live band will interpret the notes. Within the Play tab, you’ll find a number of sections to help you set up the playback, however it is likely that once you’ve become familiar with the small number of hotkeys associated with the tab, you’ll seldom have a reason to visit the tab again. The three sections to be mindful of are Setup, Transport, and Interpretation.
Setup
If you plan on trying to make Sibelius sound more realistic, then within the Setup section you’ll find the Configuration function. I typically stay to the default general MIDI option as I only ever use playback to check whether I’ve written any wrong notes, however some people prefer samples or more realistic MIDI options. On the other hand, the Mixer function can be quite useful. Once pressed, a new window opens with faders linked to each of the instruments in the score. Sometimes you may need to manually increase the volume of a certain instrument, or mute others, both of which can be done quite easily in the mixer.
Hotkey
Mixer - M

Transport
Out of all sections in the Play tab, the Transport section may be the most important. Here you’ll find the standard Start, Stop, Fast Forward, and Rewind functions, as well as Move Playback Line to Start and Move Playback Line to End. All of these work exactly how you might expect and help you control the playback.
Hotkeys
Play - Space
Play From Highlighted Bar - P
Stop - Space
Fast Forward - Alt + ]
Rewind - Alt + [
Move Playback Line to Start - Ctrl + ]
Move Playback Line to End - Ctrl + [

Interpretation
Within the Interpretation section there is one specific function which can be quite useful if you plan on writing music which swings, the Performance function. By clicking on it, you’ll open a pop-up window with a number of different options to help you manipulate the playback. For the most part you can ignore all of them except Rhythmic feel, which can be found in the top left Style section. Here you can choose a number of different feels but the three that will come in the most handy are Straight, Swing, and Swing 16. All of which can also be selected by typing out the exact same text in a Tempo text box found in the Text tab.

Layout Tab
Crossing over to the Layout tab, here you’ll find almost everything you need to format your score and parts. There are an abundance of options, with the most useful being found in the Document Setup, Staff Spacing, Staff Visibility, and Breaks sections. I would recommend spending some time getting comfortable with this tab though, as almost all of the functions are useful and might help you somewhere down the line.
Document Setup
If you want to change anything to do with the Margins, Orientation, Size, and Normal Staff Size, or add a Title Page, then the Document Setup section is for you. Everything is quite intuitive so I won’t take the time to unpack each function, however I will mention that in the bottom right corner of the section you’ll find a diagonal arrow. When clicked, it opens a pop-up window where you can customize the measurements for each of the functions considerably more than the default options on the main ribbon.

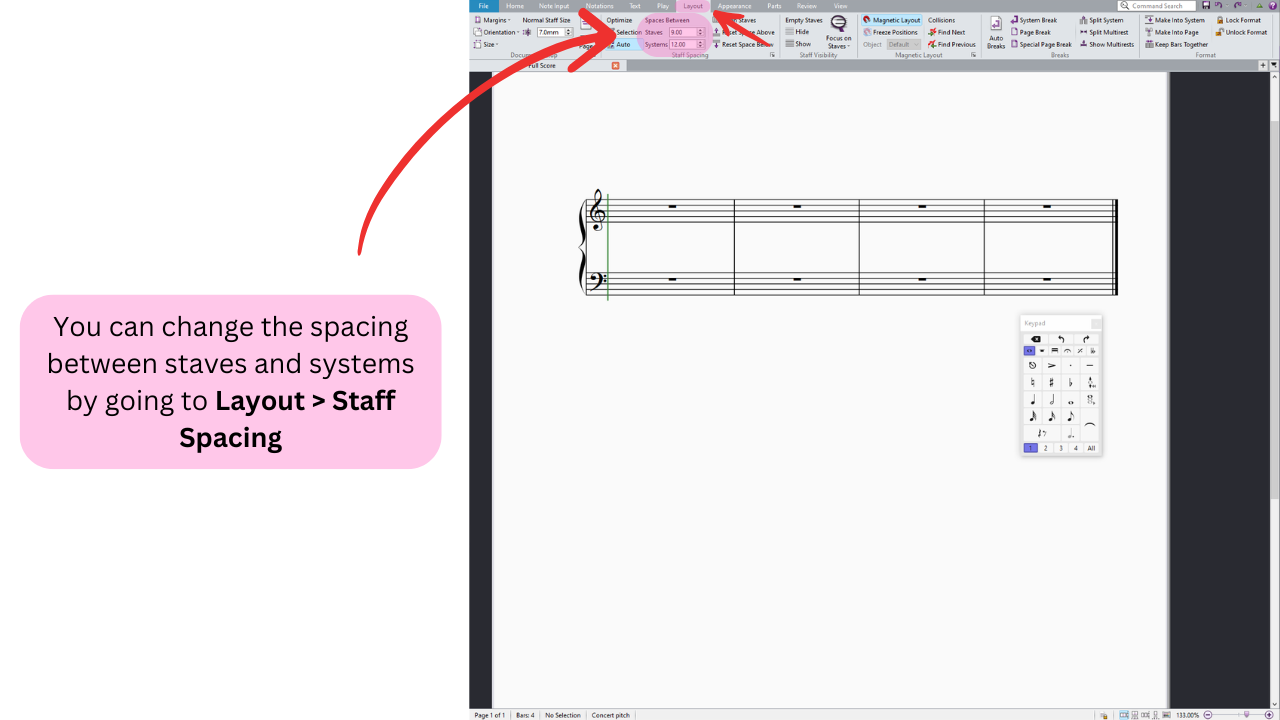
Staff Spacing
Once you’ve set up the size of your document, you can go a step further by customizing the spacing between each staff and system in the Staff Spacing section. For the most part you probably won’t use any of these functions unless Sibelius has decided to make your page look weird due to the combination of instruments and page size you’ve chosen. When this happens my first suggestion is to go back to the Document Setup section and experiment with the Normal Staff Size function, however sometimes you want the staves to be the same size and simply want to increase the space between them. If this is the case then experiment with the Spaces Between Staves & Systems function to find the perfect size for your document.
You can also highlight your entire score and then use the Optimize tool to make Sibelius choose the optimal staff/system spacing for your document. This doesn’t always work perfectly but does beat manually fixing all of the staves.

Instead of setting a fixed spacing for the entire score, you can also manually drag staves with your mouse. Once you find a spacing you like, then you can apply it to the whole score through the Align Staves function. In order to access the function, highlight the staves in question and then when you click on the function a pop-up window will appear. You’ll be faced with a few intuitive options to choose from.

Staff Visibility
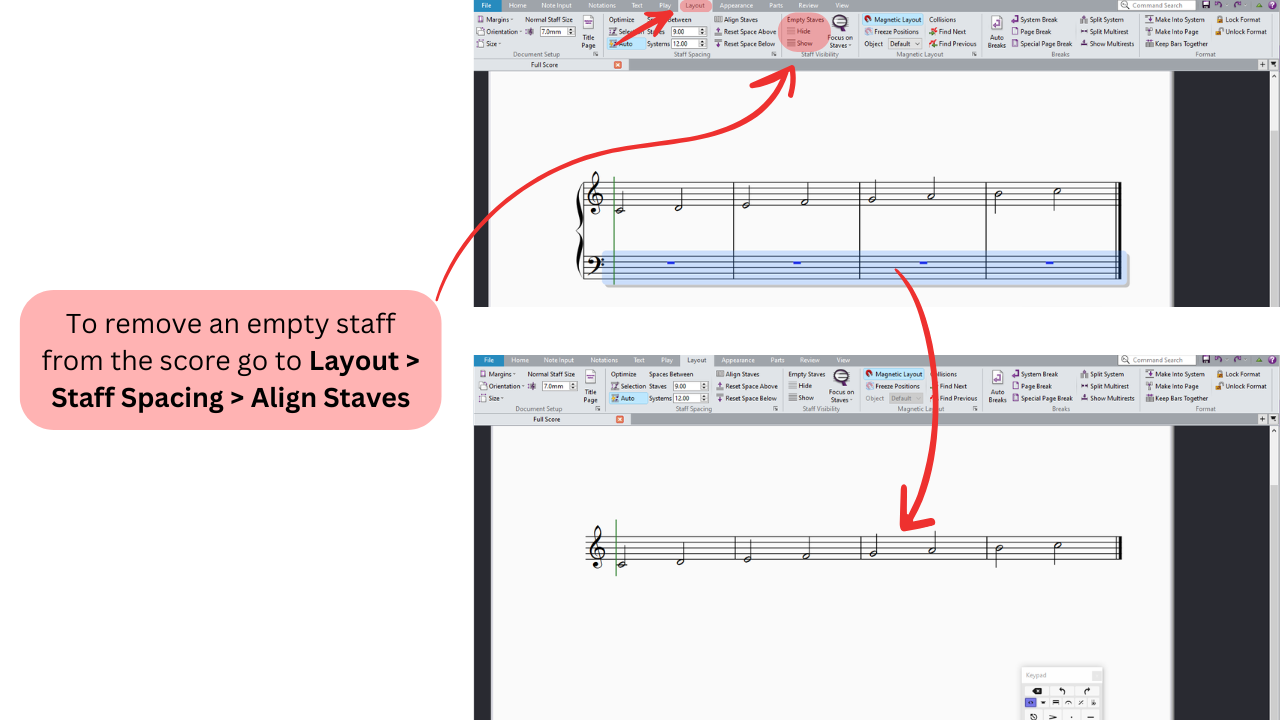
Sometimes when you are writing a score with a lot of instruments you want to save space by removing instruments which have rests. To do so, within the Staff Visibility section you’ll find the Empty Staves Hide & Show functions. Simply highlight the bars in question and click the Hide function for them to be hidden in the score. I personally use this a lot for the left hand staff of the piano.
Breaks
When I first got started formatting parts in Sibelius, I had no clue how to do a system break or a page break, and to be honest I actually had no clue what the terms official terms were too. Through some weird background menu called the inspector, I found them and then used copy/paste whenever I wanted to use a system break. It went just as slow as it sounds. Fortunately, one day I discovered the Breaks section which is the home to all sorts of breaks. For the most part, there are only three functions here you need to be aware of: Auto Breaks, System Break, and Page Break.
You’ll likely notice that Sibelius automatically formats as you go, choosing where page and system breaks take place. The only issue is that often the program makes bad decisions and when you try to correct it, you can just make the situation worse. There are hundreds of times I can think of where Sibelius has decided to page break and I’ve tried everything to fix it only to eventually admit defeat. The trick to fixing this in Sibelius is by familiarizing yourself with the Auto Breaks function. When selected, it opens a pop-up window where you can select presets for Sibelius to apply to your score. Often you’ll find that auto system and auto page breaks are already selected, which is what is causing Sibelius to format your chart. Sometimes it can work wonders but other times it can be a big headache, so my general advice is to unselect all of the options (except multirests when formatting parts) and manually input each break.

To manually input either sort of break, select a barline and then click on either System Break or Page Break. In this instance, the word system simply means the same thing as line, so when you add a system break, anything that came after the barline will be dropped to the line below. Page breaks on the other hand are a bit more self explanatory.
Hotkeys
System Break - Select a barline + Enter
Page Break - Select a barline + Ctrl + Enter


Appearance Tab
Whatever can’t be found in the Layout tab when formatting can be found in the Appearance tab. Specifically in the Engraving Rules function located in the House Style section on the far left of the ribbon. While there are so many different functions elsewhere in the tab, I’ve found the defaults to be good enough to format at a professional level.
Within the Engraving Rules function you’ll find the mother of all pop-up menus where everything you may want to change from Bar Numbers to Chord Symbols can be found. There is so much you can do with this function that it is entirely possible to spend hours deciding what presets you like the best. I know I did. The sections which are the most useful are the Accidentals and Dots, Bar Numbers, and Chord Symbols. The first allows you to change cautionary accidentals, the second allows you to choose the frequency, font, and position of bar numbers, and the last allows you to customize your chord symbols to your preferred look.

Once you’ve set up all of the settings just the way you like it, you can then Export House Style to create your own preset that you can load into any other score in the program. Not only does this capture your Engraving Rules choices, but it also saves your font choices too. Every time when you start a new score, all you have to do is click Import House Style and choose the preset you saved for it to automatically be applied to your document. I can’t tell you how much time this has saved me over years of using Sibelius and I would highly recommend spending the time finding your favorite engraving/formatting options.

Parts Tab
When I first started out using Sibelius, I had no clue that you could generate individual parts for each of the instruments in the score. For my first few charts, I simply would press print after finishing the score and magically the parts would appear. Who knows what formatting atrocities I created by letting Sibelius take the lead on the parts. Fortunately, I didn’t know any better so it didn’t impact my confidence, but I’m sure there were some seriously unplayable parts that were created due to my ignorance. Later on I realized that you can edit individual parts and the rest is history.
These days, what happens a lot with people new to Sibelius is that they go to the Parts tab and press the New part function on the far left. This does exactly what it says and creates a new part, however Sibelius has already created an original part for the instrument too, so by clicking this function you actually are creating an unnecessary second part. Instead, if you look directly below the ribbon you’ll find the Full Score tab. Follow the screen right and you’ll find a + button which is where all of your parts are actually located. No need to create a New part, just select the instrument you already have preloaded in the score and a new tab will appear with the associated part.

Within the Parts tab there is one extremely useful feature that will save you hundreds of hours if not more. You’ll find it in the Layout section and it’s called Copy Layout. What this function allows you to do is copy the layout of any part and apply it to any other part. I would still suggest checking every part individually to make sure there are no problems, but this single function will save you from having to manually format every part every time. Even when parts differ significantly, copying the layout can still save you a lot of time as it’s better than starting from scratch.

One area to be mindful of when using Copy Layout is that sometimes it adds weird spacing around key changes. The only way I’ve found to deal with this problem is to simply remove the key change from the score and then reinput it. By doing so you, it corrects the weird spacing and returns it back to normal.
Review Tab
Although this tab exists, I personally have never used it. I can see that it may be helpful if you are the sort of person that likes to add comments directly to a file, especially if sending files to and from collaborators or teachers/students. However, I find that I just generally prefer other methods such as including the notes in an email or accompanying text file. As such, I won’t spend time going into the functions found in the Review tab, and if it is something you think you’ll find useful, then you’re in luck, as all of the functions are quite intuitive.

View Tab
To round out the sizable amount of tabs in Sibelius is the View tab. Everything included here impacts how you see the document. Like the Review tab, I don’t really spend any time navigating these functions except for when things go wrong. All of the popular functions can be found elsewhere (which we will go into) which leaves a number of checkboxes that sometimes get unticked when you accidentally delete a window such as the keypad.
In the Document View section you’ll find the typical options for viewing a document. All of which can actually be found in the bottom right corner of the main interface. Generally I use the default SpreadHorizontally view for formatting and the Panoramic option when writing as sometimes page breaks can get in the way while being creative.

Directly to the right is the Zoom section which can be quite useful depending on your screen size. A basic zoom slider can also be found in the bottom right corner of the screen too. However, if you want to reset the zoom to default, the Fit Page and 100% functions can come in handy.
Hotkey
Zoom In/Out - Ctrl + Mouse Wheel
Scroll Up/Down - Mouse Wheel
Scroll Left/Right - Ctrl + Mouse Wheel

All too often I’ve accidentally hit a weird hotkey accidentally and added rulers to the screen. If you happen to do this too, you can turn them off through the Rulers section by selecting the function which is applicable to the type of ruler you have added. Another common occurrence is accidentally closing the Keypad in which case you can reopen the window by going to the Panels section and checking off the Keypad option.


Hotkey Summary
If you’re like me, just looking at all of the information on this page it can be hard to work out the most efficient way to use each function. To help you out I’ve compiled a hotkey summary of everything I use regularly so that you can start applying them in your workflow. As I’ve mentioned before, take the time to learn each hotkey even if it is slower in the beginning than manually clicking each function. Over time you’ll get faster and eventually there will be no comparison. There are many more hotkeys than the ones I’ve listed below but these are the ones I use regularly and find the most beneficial.
The following hotkeys are in no particular order.
Copy - Ctrl + C
Cut - Ctrl + X
Paste - Ctrl + V
Save - Ctrl + S
Undo - Ctrl + Z
Redo - Ctrl + Y
Highlight - Shift + arrow key
Highlight Bar - Single click on a bar
Highlight Line - Double click on a bar
Highlight Entire Part - Triple click on a bar
System Highlight - Ctrl + Single click on a bar
Select All - Ctrl + A
Deselect/Cancel - Esc
Interval Up - number (1 for unison, 2 for 2nd, 3 for 3rd etc)
Interval Down - Shift + number (1 for unison, 2 for 2nd, 3 for 3rd etc)
Move Selected Note Up An Octave - Ctrl + Up Arrow Key
Move Selected Note Down An Octave - Ctrl + Down Arrow Key
Voice 1 - Alt + 1
Voice 2 - Alt + 2
Voice 3 - Alt + 3
Voice 4 - Alt + 4
All Voices - Alt + 5
Normal Notehead - Alt + Shift + 0
Cross Notehead - Alt + Shift + 1
Slash Notehead - Alt + Shift + 3
Slash With Stem Notehead - Alt + Shift + 4
Cue Notehead - Alt + Shift + 10
Tuplet - Ctrl + number (2 for duplet, 3 for triplet, 4 for quadruplet etc)
Repeat Note - R
Crescendo - H
Decrescendo - Shift + H
Slur - S
System Break - Select a barline + Enter
Page Break - Select a barline + Ctrl + Enter
Play - Space
Play From Highlighted Bar - P
Stop - Space
Fast Forward - Alt + ]
Rewind - Alt + [
Move Playback Line to Start - Ctrl + ]
Move Playback Line to End - Ctrl + [
Mixer - M
Add or Remove Instrument - I
Change Instrument - Ctrl + Alt + Shift + I
Transposing Score On/Off - Ctrl + Shift + T
Add Bar At End - Ctrl + B
Add Bar - Ctrl + Shift + B
Delete Bar - System Highlight (Ctrl + Left Mouse Click) + backspace or delete
Flip Stem Direction - X
Technique Text - Ctrl + T
Expression Text - Ctrl + E
Tempo Text - Ctrl + Alt + T
Dynamics Text- Expression text + Ctrl (then type in dynamic)
Lyric Text - Ctrl + L
Chord Symbol Text - Ctrl + K
Rehearsal Mark Text - Ctrl + R
Boxed System Text - Right click dropdown menu
Plain System Text - Right click dropdown menu
Zoom In/Out - Ctrl + Mouse Wheel
Scroll Up/Down - Mouse Wheel
Scroll Left/Right - Ctrl + Mouse Wheel
Miscellaneous
Outside of the mountain of information we have just covered, there are three other functions within Sibelius that are worthy of mentioning. The first is the Search Bar in the top right corner of the main interface. If you ever are unsure of where a certain function is but you are aware of the name, type it into the search bar and it will show you not only where to find it but you can directly access the function through the search results. The Search Bar is a great tool when beginning your Sibelius journey, and definitely has come in handy a number of times when I started learning the program.

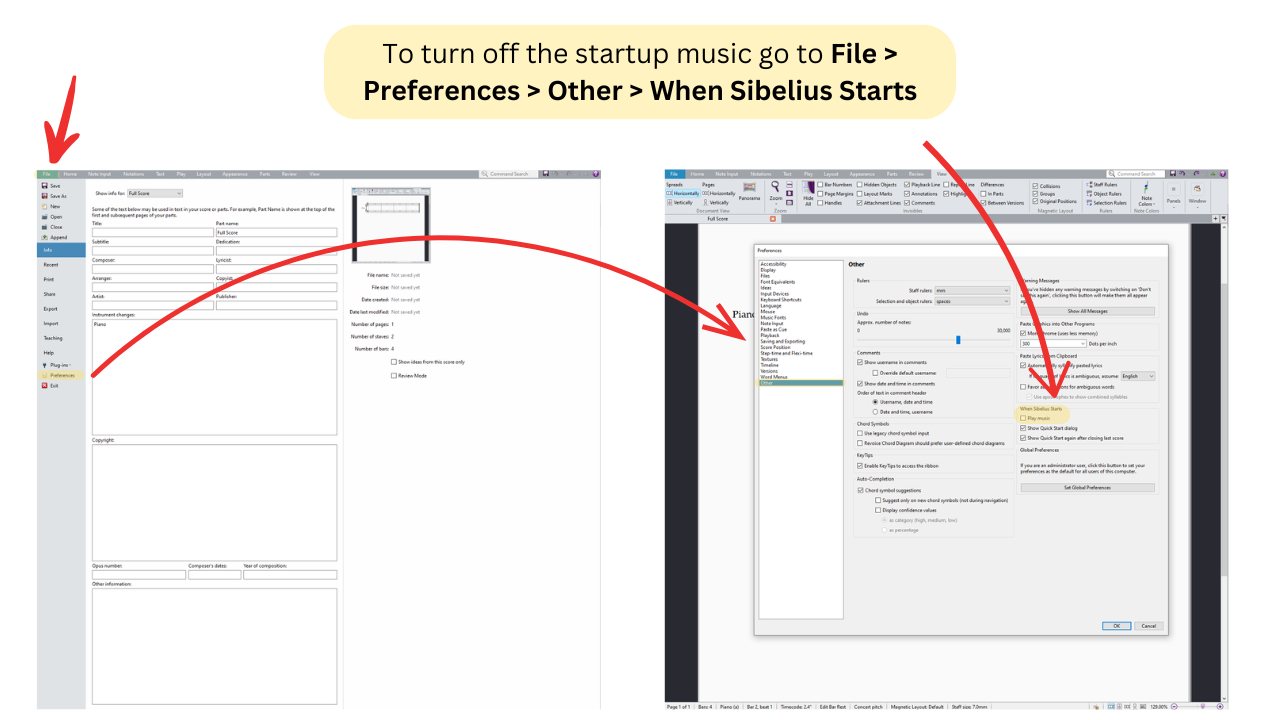
The second function to be aware of is how to turn off the start up music. When you’re just starting out, the music can be nice but I promise after the hundredth time hearing it you’ll want to know how to turn it off. To do so, go to the File tab and select Preferences which is at the bottom of the left hand column of options. This will open a new window where you need to select Other and then locate the When Sibelius Starts area. Under the title you’ll find a checkbox next to Play music, simply unselect it to stop the startup music from ever playing again.
Finally, this is quite niche but it is definitely a rabbit hole I’ve gone down and I know someone reading this will benefit from me including it here. If you want to change any of the fonts for any sort of text in Sibelius and have it saved to your house style, go to the Text tab, and in the bottom right hand corner of the Styles section click on the diagonal arrow. This will bring up a pop-up window where you can select every single text option in the program, from which you can pick the relevant option to you and change aspects like the font and size of the text. Once you’re happy you can then export out the house style in the Appearance tab.

The Takeaway
Congratulations, you have successfully made it through all of the major components of Sibelius. I’ve tried my best to include absolutely everything I find useful about the program and unpack how each function works. I know if it feels like a lot from my end as someone that is comfortable with the program, then it likely feels extremely overwhelming from the perspective of someone just starting out. This resource isn’t going anywhere, so take it slow and go through each of the functions and learn how they work. Get used to the hotkeys and navigate through the tabs until you feel comfortable locating all of the functions which are useful to you. Nobody can master Sibelius overnight and it will take some serious hours and repetitions to use the program efficiently. Many have gone through that process so you know it’s possible and before long you’ll be right here with us!